Xstress DR45

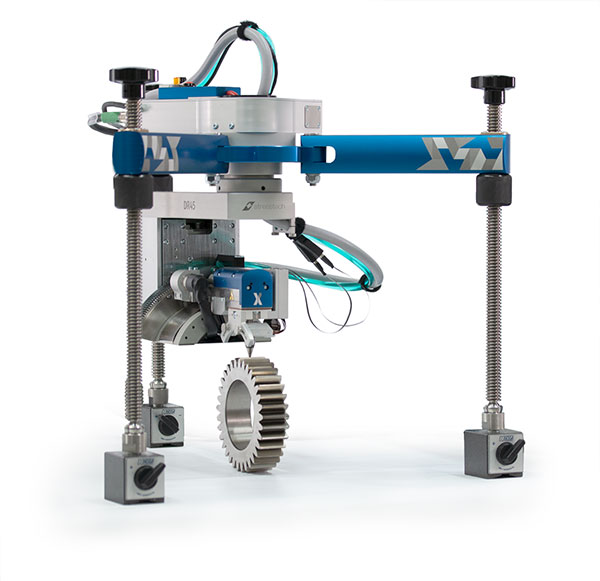
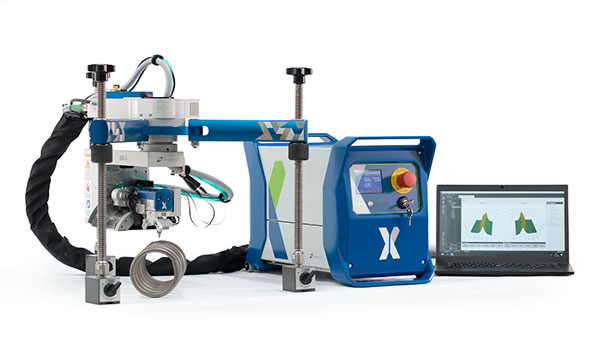
Xstress DR45 is a new generation of X-ray diffractometers, delivering comprehensive data faster than before. Xstress DR45 takes residual stress measurements beyond just a laboratory setting and into the production area. The ease of an uncomplicated user interface is backed by seamless efficiency.
For field use
- Quick assembly, ready to use in 10 minutes
- Robust design in diffractometer and Xstress MU
- Diffractometer design enables measurement on uneven surfaces; with magnetic legs diffractometer can be fixed to different positions
For laboratory use
- Follows the standard EN15305
- Multiple calculations available, includes features such as linear and elliptical regression, Dölle-Hauk, stress tensor and principal stresses. Peak fitting functions include cross-correlation, parabolic, Gauss, Lorentz, modified Lorentz, intermediate Lorentz, Pearson VII, Pseudo-Voigt, Voigt, centroid, centered centroid, sliding center of gravity, and midchord
- X-ray diffractometer design enables measuring a great variation of different sized and shaped parts
- Effortless and fast X-ray tube change


For manufacturing industry
- Fast measurement, suitable even for production area
- Easy to use software for operators
- Templates for frequent measurements
Features:
Xstress DR45, diffractometer
- Rotation +- 180°
- Tilt +-45°
- Standard measurement distance 45mm
- Magnetic legs with height adjustment
X-ray tube:
- Chromium (Cr) with HV cable
- Max. output 30 kV/9 mA/270 W
- Quick change
Detector set for Xstress DR45
- 2D detectors, 2 pieces
- Quantum efficiency >90%, at 5 keV
- 256 x 256 pixels
- pixel size 55 µm
- No dark current
- Detector arc 45 mm
- 2θ-range of the detectors:
- Adjustable within 127-165°
- Indexed positions 135°/ 145° and 156,4°
- 2θ-range of the detectors:
Xstress MU
- X-ray power supply 5–30 kV/0–10 mA freely adjustable within limits
- Self-contained liquid cooling system
- Includes all interlocks required for complete safety
- Touch screen for hardware status
Xstress Studio*
- Measurement control
- Data analyzing
- Measurement visualization
- Hardware operation control
*Detailed information below
Tool set for Xstress DR45
- Complete tool set for the system adjustment and maintenance
Cables
- Power cable for Xstress MU
- Ethernet cable for connecting Xstress MU to computer
Measuring accessory set for Xstress DR45:
- Replaceable collimators
- Different sized collimators for optimizing measurement area and measurement time
- 0.5/1/2/3/4 mm spot sizes
- Set of stress-free powder samples for distance calibration
- Fe-ferr. / Fe-aust. / Al
- Accessories for system maintenance e.g. spare fuses
Transport packages
- Aluminum transport packages for system delivery and storage
DR45 Residual Stress Measurement in One Direction – Examples
| Material | Mode | Collimator | X-ray tube | Power | Number of tilts | Tilting range | Measurement time |
| Steel | Modified χ | 1 mm | Cr | 270 W | 5/5 | -45°/45° | 29 s |
| Steel | Ω | 0.5 mm | Cr | 270 W | 4/4 | -45°/45° | 25 s |
| Steel | Modified χ | 0.3 mm | Cr | 270 W | 5/5 | -40°/40° | 80 s |
| Titanium | Modified χ | 2 mm | Cu | 300 W | 5/5 | -45°/45° | 69 s |
| Titanium | Modified χ | 1 mm | Cu | 300 W | 6/6 | -45°/45° | 60 s |
| Inconel 718 | Modified χ | 1 mm | Cr | 270 W | 5/5 | -45°/45° | 90 s |
| Textured Magnesium | Modified χ | 3 mm | Cr | 270 W | 5/5 | -45°/45° | 120 s |
| Al | Modified χ | 1 mm | Cr | 270W | 5/5 | -45°/45° | 30 s |
| Cu | Modified χ | 1 mm | Cr | 270W | 5/5 | -45°/45° | 30 s |
| WC | Modified χ | 3 mm | Cu | 270 W | -5/5 | -45°/45° | 45 s |
| WC | Modified χ | 3 mm | Cr | 270 W | -5/5 | -45°/45° | 45 s |
| WC | Modified χ | 3 mm | Mn | 210 W | -5/5 | -45°/45° | 45 s |


